目次
構築環境
環境は、「Rails 5.2.4」です。
モデルの設計・マイグレーション
まず、モデルの設計です。
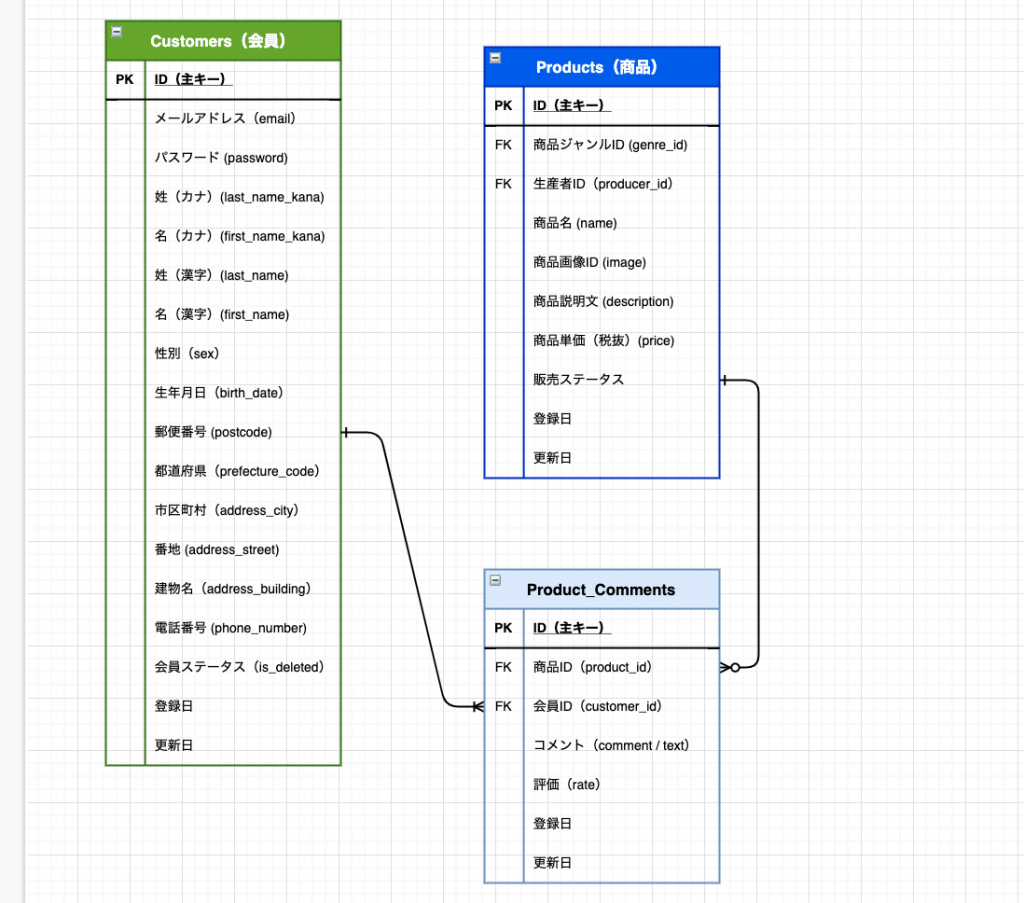
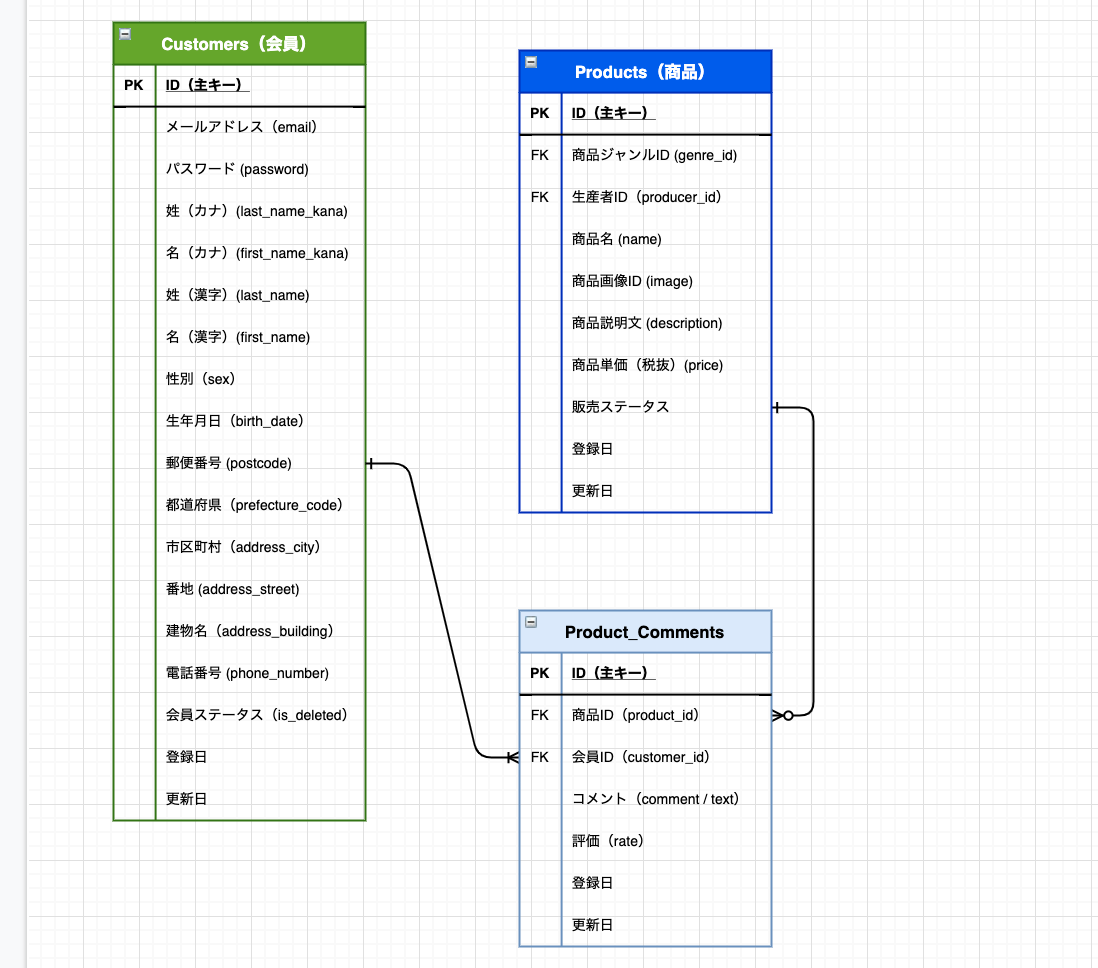
今回は、ECサイトの商品のコメント・評価で使うので、このような関係性になります。
「Customers」モデル(devise利用)
「Product」モデル
「Product_Comment」モデル

マイグレーションファイルはこんな感じで作りました。
(今回は「Customers」モデルは除きます。)
class CreateProducts < ActiveRecord::Migration[5.2]
  def change
    create_table :products do |t|
      t.integer :producer_id, null: false
      t.integer :genre_id, null: false
      t.string :name, null: false
      t.text :description, null: false
      t.integer :price, null: false
      t.string :image_id
      t.integer :sale_status, null: false, default: 1

      t.timestamps
    end
  end
end
class CreateProductComments < ActiveRecord::Migration[5.2]
def change
create_table :product_comments do |t|
t.integer :product_id, null: false
t.integer :customer_id, null: false
t.float :rate, null: false, default: 0
t.text :comment, null: false
t.timestamps
end
end
end「Raty.js」を作るのに欠かせないのが、「rate」カラムです。
今回は、整数のみで利用しますが、構築の仕方によっては、「星1.5」とか、細かい評価ができるようにするため、「float型」が用いられています。
あとは、作成した「porduct_comment」モデルに以下のバリデーションを追加します。
validates :rate, numericality: {
    less_than_or_equal_to: 5,
    greater_than_or_equal_to: 1}, presence: true
表示用の「星」画像を追加
https://github.com/wbotelhos/raty/tree/master/lib/images
から、画像をダウンロードして、「app/assetes/images」直下に保存します。
「jquery.raty.js」の配置と読み込み
https://github.com/wbotelhos/raty/blob/master/lib/jquery.raty.js
から「jquery.raty.js」のソースをコピーするなどして、
「app/assetes/javascripts/jquery.raty.js」で保存。

加えて、「application.js」に「//= require jquery.raty.js」を追加してあげます。

これで、「jquery.raty.js」が読み込めるようになりました!
Viewの作成
最初にコメントのフォームからです。
<%= form_with(model: [product, product_comment], url: product_product_comments_path(product), local: true) do |f| %>
    <%= render 'layouts/error_messages', object: f.object %>

    <%= f.text_area :comment, rows:'5', placeholder: "商品のコメント", class: "form-control form-control-sm" %>
    <div id="rating-form">
        <label>評価:</label>
        <%# scoreNameの値をhidden_fieldでカラムに送っている %>
        <%= f.hidden_field :rate, :value => 'score' %>
    </div>

    <%= f.submit "投稿する" %>
<% end %>


<script>
    $('#rating-form').raty({
        starOn: "<%= asset_path('star-on.png') %>",
        starOff: "<%= asset_path('star-off.png') %>",
        scoreName: 'product_comment[rate]'
    });
</script>
コメントの一覧表示は以下です。
<% product.product_comments.each do |product_comment| %>
    <div class="pt-2 px-2" style="background-color: #fffffe; border: 2px solid #272343; border-radius: 2px;">
        <%# rateを表示 %>
        <div class="review-rating" data-score="<%= product_comment.rate %>">評価:</div>

        <div class="text-left">
            <p>投稿者:<%= product_comment.customer.full_name %></p>
            <p><%= product_comment.comment %></p>
        </div>

        <div class="text-right">
            <p>
                投稿日:<%= product_comment.created_at.strftime('%Y/%m/%d') %> |
                <% if product_comment.customer == current_customer %>
                    <%= link_to product_product_comment_path(product_comment.product, product_comment), method: :delete, class: "btn btn-sm btn-danger" do %>
                        コメント削除 <i class="fas fa-trash"></i>
                    <% end %>
                <% end %>
            </p>
        </div>
    </div>

    <div class="pb-2"></div>

<% end %>
平均点の表示
平均点はこれで表示できます。
<div class="average-review-rating" data-score=<%= product.average_rate %>></div>

<script>
  $('.average-review-rating').raty({
    readOnly: true,
    starOn: "<%= asset_path('star-on.png') %>",
    starOff: "<%= asset_path('star-off.png') %>",
    starHalf: "<%= asset_path('star-half.png') %>",
    score: function() {
      return $(this).attr('data-score')
    }
  });
</script>
私は、部分ごとでパーツ化してました。


